Tampilkan postingan dengan label MOV. Tampilkan semua postingan

Selasa, 23 Juli 2013

Magic Lantern firmware boosts dynamic range of Canon 5D III and 7D


The folks at Magic Lantern are no stranger to adding new features to Canon DSLRs, courtesy of their EOS Camera Tool software.  

Magic Lantern's brought some miraculous features to Canon EOS DSLRs lately, including RAW video recording on the 5D Mark III, and video recording, period, to the 50D. Its latest feat is no less amazing, even for jaded DSLR shooters.

By exploiting unused dual ISO amplifiers on a sensor chip in the Canon 5D Mark III and 7D, new firmware allows you to record lighter parts of a scene at ISO 100 and darker portions at ISO 1600. It works with RAW video and stills on the 5D III and RAW stills only on the 7D, with both requiring post-processing after capture. That bit of creative coding increases the dynamic range of both cameras to around 14, though not without some drawbacks. Namely, the 7D implementation is buggy for now, you'll lose some resolution while gaining aliasing in shadows and highlights, and won't be able to check critical focus by zooming in. Still, the organization has a track record of quickly improving new features -- so, if you've got the guts to risk voiding your warranty, hit the source.

Their latest creation - called Dual ISO - dramatically increases the dynamic range of the 5D Mark III and EOS 7D by four stops, bringing the total dynamic range to 14EV. This allows you to pull detail out of the shadows with a lot less noise than with the 'stock' firmware. The technical details are complex, but simply put, it works by interlacing two rows of pixels captured at ISO 100 with two rows taken at a higher sensitivity (usually ISO 1600). The low sensitivity rows capture highlight detail, while the high ISO rows capture shadow detail. When they are combined, you get relatively noise-free shadows without blowing highlights.

According to Magic Lantern, there are some downsides to using the Dual ISO firmware, though. Vertical resolution is reduced by half and there's more moirĂ© and aliasing in over and underexposed areas. The author also warns that since this software modifies the sensor's operation, you could end up frying your camera. 

Canon Related guides:
 
Transcode Canon PowerShot N to FCP X
Canon EOS 6D MOV to FCP
Import Canon 100D MOV to FCP 6/7
Edit T2i/550D MOV in FCP X
Play Canon T5i mov on QuickTime
Edit Canon EOS T4i MOV in iMovie
Work with PowerShot N in Apple Aperture 3


Senin, 22 Juli 2013

How to Convert QuickTime movie to iMovie on Mac OS X 10.9 Mavericks

Summary: If you don't know how to smoothly import QuickTime movie to iMovie on Mac OS X 10.9 Mavericks, just read this article, you will get the tools and steps, follow it!


QuickTime (.MOV) file format is a file extension used by the QuickTime-wrapped files. The format was created by Apple Computer to work with multimedia files. MOV is a container format and can contain video, animation, graphics, 3D and virtual reality (VR) content or text (for subtitles, for example).

However, many Mac users are still puzzled by one thing that some files from QuickTime with MOV file extension can't be imported into iMovie on Mac OS X 10.9 Mavericks as iMovie does not support the standard MOV QuickTime file format.

If you want to import a QuickTime movie file into iMovie on your Mac OS X 10.9 Mavericks, you are suggested to transocde QuickTime videos to AIC (Apple Intermediate Codec), the favorite editing codec of iMovie at first. The Apple Intermediate Codec (AIC) does not use temporal compression, so every frame can be decoded and displayed immediately without first decoding other frames. The drawback of this codec is that it requires much more bandwidth and hard drive storage space. The following are steps for you to QuickTime MOV to AIC MOV for iMovie editing.

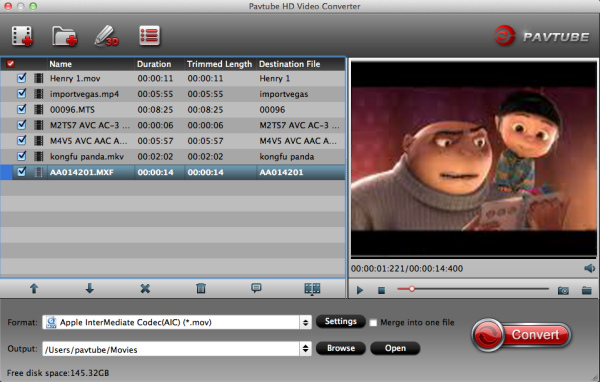
Step 1: Run Pavtube Mavericks HD Video Covnerter for iMovie and video clips to it. You can click either "Add Video" button or "Add from folder" button to load source files.


If you want to combine the loaded MOV clips into one file, simply tick off the checkbox before "Merge into one file".

Step 2: Select "Apple InterMediate Codec (AIC) (*.mov)" as target format.

In order to convert video to AIC for use in iMovie, simply hit "Format" menu and follow "iMovie and Final Cut Express" > "Apple InterMediate Codec (AIC) (*.mov)".


Settings:


Step 3: Start QuickTime MOV to AIC Conversion.

Click the big button "Convert" to start converting QuickTime movie to iMovie on Mac OS X 10.9 Mavericks. As soon as the conversion is completed, you are able to click "Open" button to get the generated AIC MOV files for use in iMovie.

Step 4: Import converted videos to iMovie 8/9/11.


Launch iMovie, from the File menu, choose Import > Movies, navigate to the folder that output MOV videos are saved. Select the files and click "Import".

Now, start to create your masterpiece with QuickTime movie in iMovie (iMovie 11/iMovie 09/iMovie 08/iMovie HD)!

Read more iMovie solutions:

Convert AVCHD MTS/M2TS to AIC MOV for iMovie?
Load Canon Vixia AVCHD MTS to iMovie
Encode Sony AVCHD MTS/M2TS to AIC MOV for iMovie
Edit Panasonic MTS files with iMovie
How to edit Nikon D5200 MOV with iMovie freely
Import Canon MXF files to iMovie

Kamis, 04 Juli 2013

Mac Solution: Burn/Write/Make Canon EOS 1080p MOV into DVD

Summary: This article will show you how to successfully burn/write Canon EOS 1080p mov clips to DVD for playing with DVD player or backup on Mac OS X (Mountain Lion 10.8 included).


Canon EOS is very popular nowadays, common modes include Canon 5D Mark III, Canon T2i/T3i/T4i/T5i, Canon EOS M , Canon 60D, Canon EOS 6D, Canon EOS 70D etc, which recording H.264 MOV format. It is some meaningful occasions in life and burn the videos to DVD to share with their friends or relatives.

Most of us would choose Canon EOS 1080p as the recording mode, as it provides high quality videos. However, it is not so easy to burn Canon EOS MOV files into DVD for the 1080p H.264 codec. Fortunately Here a useful tool or software- Pavtube DVD Creator for Mac is recommended to you. With it, you don’t need to worry about the quality of the output and the conversion speed. The quality of the output DVD will be as good as the original video and the conversion speed will surprise you. With just a few clicks, you can get what you want.

This article will show you how to successfully burn/write Canon EOS 1080p MOV clips to DVD on Mac OS X (Mountain Lion 10.8 included). 

Cant wait to have a try? Below is how Canon MOV to DVD Burner works

1.
Free download this Mac Canon MOV to DVD burnner (50% off now). You can see the main interface. Connect your DVD Writer and insert a blank DVD.


2. Load your EOS 1080p video files into the DVD creator for Mac. Use the EOS camera as a Firewire device, connect your camera to your computer via a Firewire cable and transfer and copy the footage onto your computer or another external Firewire device using the PC/Dub mode.

a. Drag and drop source files to source area (details in Source Screen)
b. Select “add Files” from the drop-down list of Quick Start menu

Each file is recognized as a chapter after being imported to DVD Creator. Press on “Add title” button to add more titles. And you can do some arrangement for titles or chapters.

3. You can Edit movie clip and Customize your DVD menu
Pavtube DVD Creator for mac will enables you to edit your videos with trim, crop, watermark, effect settings, audio replacing settings features if necessary before burnning.

Tip: Swich to “Audio” Tab from Edit, and add audio to target video file so that you can replace the original audio track with favorite melody. Check the box of “Enable” and click “Browse” button and select the audio or video file you’d like to add. You may check “Loop” to make the audio repeat in order to fit the full length of the video.


This MOV-to-DVD Creator also allows you to design and create your own DVD menu or add background picture as well as music to make your DVD more personalized. To use a preset menu template and simply double-click on the template.

4. Preview Created DVD-Video. It’s great that you can preview the created DVD before burning to make sure everything is going well, and then you can choose to burn a DVD disc, a DVD folder, or a DVD ISO.


5. Start burning.

Click the “Burn” button to start burning Canon EOS 1080p H.264 MOV files to DVD on Mac – video to a writable DVD (or ISO image) that will plays on standard DVD player after burning. Now you have finished the burning process and get the created DVD for watching on your home DVD player or TV.


With this professional 50% off MOV to DVD Maker, you will find it pretty easy to convert Canon EOS MOV files to DVD for you to enjoy a quality time watching movies with your family at home. Never miss!

P.S.

1. This DVD Burner is free for burning various videos like MKV, AVI, MP4, WMV, MOV, TiVo, F4V etc into DVD. To know more, please switch to the online guide about Mac DVD Creator on-line help for beginners at Pavtube website and learn how to make an iso image into DVD and write DVD-Video file structure/VIDEO_TS folder to DVD.

2. Learn how to burn Sony Handycam AVCHD MTS file to DVD, write Sony XAVC footage to DVD and convert Panasonic P2 MXF for DVD burning.

Rabu, 03 Juli 2013

Canon EOS 70D Hands-On, Review, Main features, and More Info

Changing the way users capture still images and video with a DSLR camera, Canon proudly introduces the EOS 70D.


At the core of the 70D's modifications is what Canon's calling Dual Pixel CMOS AF. Essentially, the sensor includes twice the number of pixels in an (very successful) attempt to improve focusing. There are 40.3 million photodiodes on the sensor, and when they're all working together, "it's like 20 million people tracking the focus with both eyes," as Canon explains. The result is camcorder-like focusing for both stills and video, when you're shooting in live view mode. During our test with a pre-production sample, the device performed phenomenally, adjusting focus instantaneously when snapping stills, and quickly but gradually when recording video.

Reviewing- Canon EOS 70D main features:


  • 20.2 Megapixel CMOS (APS-C) sensor, 14-bit A/D conversion, ISO 100-12800 (expandable to H: 25600) for shooting from bright to dim light and high performance DIGIC 5+ Image Processor for exceptional image quality and processing speed. 
  • EOS Full HD Movie mode with Movie Servo AF for improved continuous focus tracking of moving subjects, manual exposure control and multiple frame rates (1080: 30p (29.97) / 24p (23.976) / 25p, 720: 60p (59.94) / 50p, 480: 30p (29.97) / 25p), built-in stereo microphone, manual audio level adjustment with attenuator function to reduce audio clipping, and Video Snapshot with editing for expanded movie shooting options. 
  • Vari-angle Touch Screen 3.0-inch Clear View LCD monitor II (approximately 1,040,000 dots) with smudge-resistant coating features multi-touch operation and Touch AF for an easy and intuitive experience, flexible positioning, and clear viewing even when outdoors in sunlight.
  • Built-in wireless technology allows you to wirelessly transfer your images to social networking sites through CANON iMAGE GATEWAY, share your images with wireless-enabled Canon cameras, or upload virtually anywhere on your iOS® or Android(TM) smartphone* with the free download of the EOS Remote app.
  • Canon's innovative Dual Pixel CMOS AF enables you to shoot video like a camcorder with smooth, fast, and accurate autofocus; lets you enjoy instant and precise autofocus even when shooting stills from a variety of angles with the freedom provided by the Vari-angle LCD. 19-point all cross-type AF system (including a high-precision f/2.8 dual cross-type AF center point) with a wide area arrayfor exceptional autofocus performance and greater compositional freedom when shooting with the viewfinder. Intelligent Viewfinder with superimposed LCD display provides approximately 98% field of view, and Multi-Aspect ratio in Live View broadens your choices in composition. 

The 60D will be discontinued, but the 7D will remain on the market -- for a while longer, at least. Still, if you're looking for a DSLR primarily for shooting video, the 70D is where it's at.

Canon related guide:
Transcode Canon PowerShot N to FCP X
Canon EOS 6D MOV to FCP
Insert Canon PowerShot A2500 MOV to FCP
Import Canon 100D (SL1) MOV to FCP 6/7
Edit T2i/550D MOV in FCP X
Transcode T5i MOV to FCP 6/7
Play Canon T5i mov on QuickTime
Convert 650D/T4i MOV to Prores for FCP
Edit Canon EOS T4i MOV in iMovie
Work with PowerShot N in Apple Aperture 3
G12 MOV and Avid MC workflow