Senin, 05 Agustus 2013

Does Canon XF MXF files works ok with After Effects CS6 on Mac?

Summary: This article will focus on talking about how to transcode Canon XF MXF files to Adobe After Effects CS6 compatible format for Canon XF MXF and AE importing workflow on Mac.


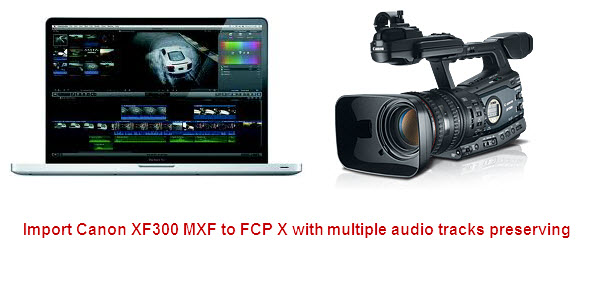
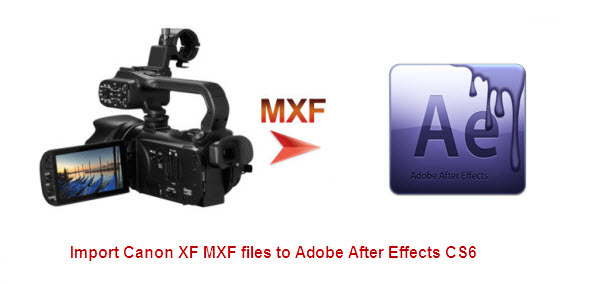
Canon's XF series camcorders like Canon XF100, XF105, XF300, XF305 record high-definition MXF video with its own XF codec. 

Does the Adobe After Effects CS6 support Canon XF MXF footage? 

Hi All.. we are considering picking up a Canon XF-100 as our acquisition camera. However I heared that these MXF files can't work with After Effects natively. Will we need to transcode via Prelude? Thanks... 

This is for .MXF files shot on a Canon XF300. Things were working fine, but suddenly I am unable to open those mxf files in AE CS6. Even projects previously created with AE CS6 now won't open, and give me the 'file damaged or unsupported' error message in AE. Why does this happen? Any help would be much appreciated. 

As above, much to the disappointment of filmmakers that are not familiar with the .mxf format, the footage created with Canon XF Camcorders can't be imported to After Effect CS6 smoothly. If you need to edit Canon XF MXF in Adobe After Effects CS6, you are suggested converting the Canon MXF clips to an AE friendly format.  

And here  the professional and powerful MXF to AE Converter can help you do the job. With it, you can easily transcode Canon XF .MXF files to Adobe After Effects accepted AVI, MOV, MPEG or other formats that After Effect can handle well. Below is a quick guide of converting Canon XF .mxf to .mov for editing in After Effects CS6.

Before processing:

1. Back up/Transfer the Canon XF MXF footage to Mac computer – copy the whole XF video folder to your computer hard drive, not just the individual .mxf files.

2. Install Pavtube MXF Converter for Mac ($29). Click here to download a free trial for test.

Step-by-step Guide: Convert Canon XF.mxf to AE CS6 supported format with best  video quality

Note: this is a Mac oriented solution. For Windows users the Pavtube Studio offers alternative MXF Converter for PC, which is very similar to the Mac MXF Converter.

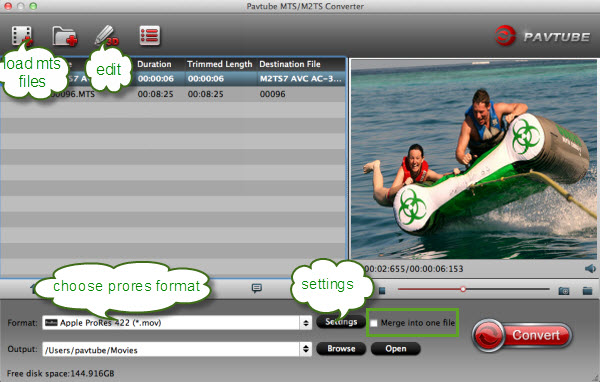
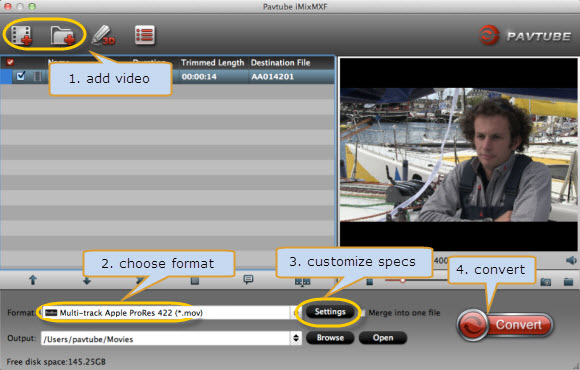
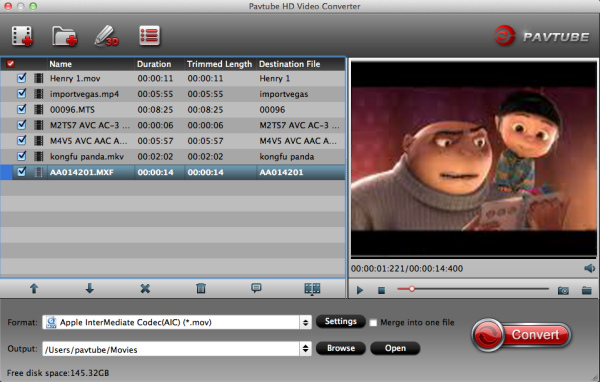
Step 1. Launch the Mac Canon MXF Converter for After Effects. Click “Add Video” and browse to a Canon .mxf clip and the software will add it to file list. Repeat the operation to load multiple mxf videos. Or you may click the “Add Folder” button to import all the .mxf files in the XF file structure.

image

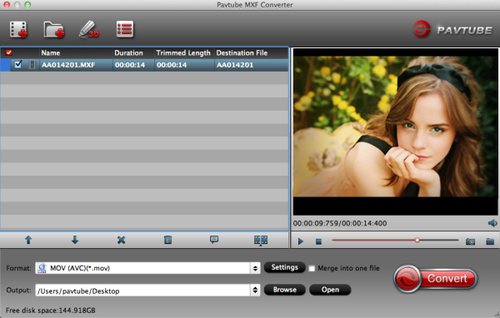
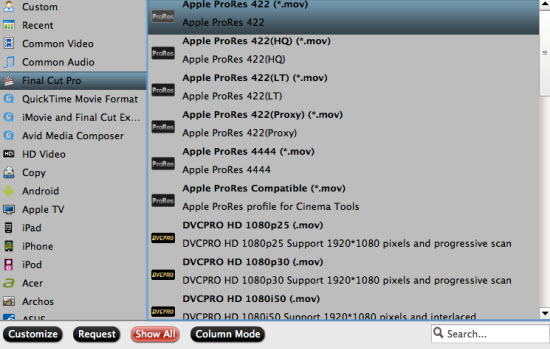
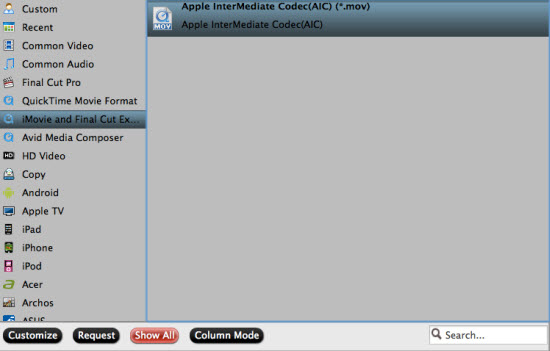
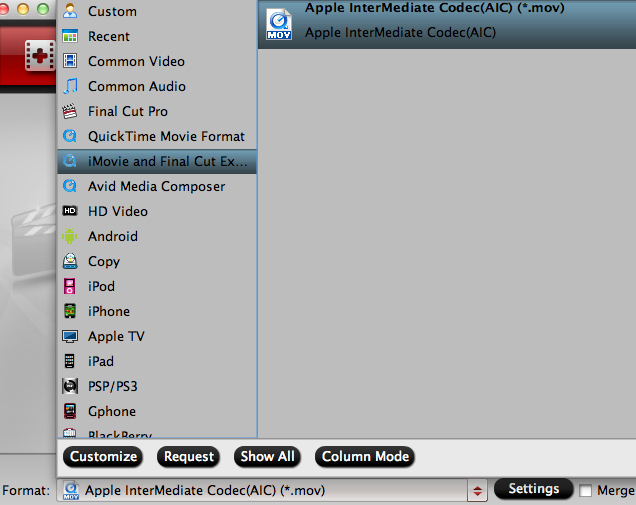
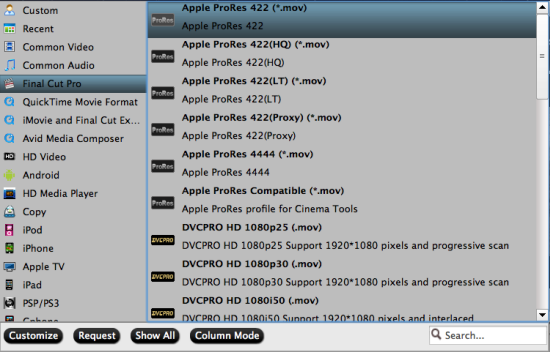
Step 2. Click on “Format” and choose “Click on “Format” and choose “MOV(AVC) (.mov)” from "Adobe Premiere/Sony Vegas" as the best codec for editing Canon XF MXF file in After Effects CS6.

image

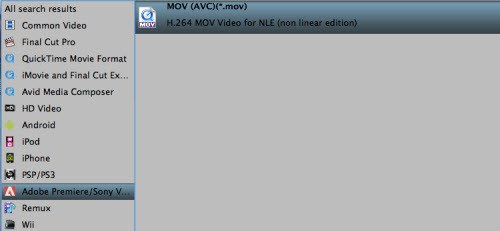
Tips: You may also use AVI, MP4, MPG, QuickTime mov or any other format that AE supports.

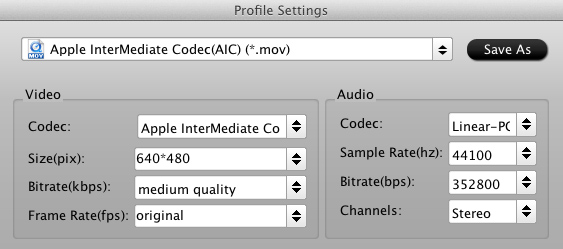
Step 3. Click on “Settings” to redefine output quality. You can also set a different video resolution (1920×1080/1440×1080/1280×720/720×480), frame rate (24p/30p), bitrate, audio channels, etc. For users who would like to retain exactly the same settings (without any quality loss), set target settings the same to source video.

Step 4. Click “Convert” to start transcoding Canon XF MXF to MOV for After Effect CS6 editing on Mac.

After conversion click “Open” to find .mov videos and import converted .mov files to Adobe After Effect CS6 for editing.

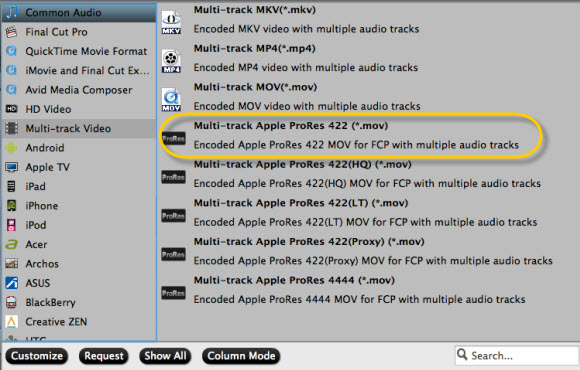
If your MXF files have 2 audio tracks or more, here is another worth-buying software from Pavtube named iMixMXF with multi-track preserving and mixing features. You can download the trial version to have a try!

Related links:

Convert MXF on Win/Mac
MXF files not read by Premiere Pro CS6
Transcode MXF to MP4
Convert MXF to multi audio tracks MKV

Kamis, 01 Agustus 2013

Seamlessly transcode MXF to MP4 with multiple audio tracks for playing and editing

Having so many MXF collections, and don't know how to edit/play MXF on Mac? You come to the right place. Get the easiest solution here!


Maybe you are a video lover. Have you ever encountered such problem that when you have shot many MXF footage with your lovely camcorder, looking forward to play or edit these mxf files on your mac, but only get the error message. Now just read the article to learn how to solve it in detail.

What is MXF?

According to Wikipedia, MXF is a file format for professional digital video and audio media defined by a set of SMPTE standards. MXF format is often used by more and more professional camcorders like Sony XDCAM, Panasonic P2 and Canon etc. to store video, audio, and programmed data.

What is the problem?

The fact is that MXF is MXF is a container or wrapper format which makes it incompatible with most of popular Mac editing software including iMovie, Final Cut Pro, Final Cut Express, Avid Media Composer, Adobe Premiere ,etc and not playable by many video players and portable players on Mac. Therefore, it will be like a mission impossible for us to edit/play the MXF video footage on Mac directly due to the format issue.

How to solve the problem?

To transport MXF to Mac for post production and playback without the format restriction, we had better convert MXF videos to something more common, like H.264 encoded MP4 video with a solid and intuitive MXF to MP4 Converter for Mac.

Pavtube iMixMXF which is strongly recommended to conduct the MXF to MP4 Conversion on Mac seamlessly. It is professionally designed to deal with the problems of edting/playing MXF on Mac. Particularly it features with keeping multiple audio tracks. In other words, it can help you to transcode MXF to MP4 with multiple audio tracks for playing and editing in a very short time. Refer to the following guides to convert MXF to multi-track MP4 on Mac.

Step 1. Download and install Pavtube MXF audio Mixer. Transfer the MXF files to HDD first and then click "Add" and browse to source .mxf video clips.


Step 2. Click on "Format" and choose "Multi-track Video>Multi-track MP4 (*.mp4)". This format will let you convert MXF to Multi-track MP4 H.264 video at 1920Χ1080 resolution and keep full HD quality.


Step 3. Click "Convert" to start transcoding MXF recordings to MP4 with multiple audio tracks for playing and editing on Mac.

Spare a few minutes to have a look at how to convert MXF to MP4 on Mac quickly and precisely.

After conversion click "Open" to find 1080p HD shootings in MP4 format and use them freely in QuickTime Player,Final Cut Pro and many other media players/editing software. Now you can import MXF on Mac for editing and playing MXF files on Mac without causing any problems.

Additional Contents

If you don't want to get multi-track videos or your videos has less that two audio track, you can try Pavtube MXF Converter for Mac (only $29), an alternative professional MXF to MP4 Converter and a good partner with your simple and efficient MXF to MP4 Conversion workflow on Mac.

Related guides:

Convert Sony HandyCam video to MP4
Transcode AVCHD MTS to MP4
Panasonic FZ200 MTS to MP4 Converter
MXF to AVI/WMV/MOV/MP4/MPEG on Win/Mac
XAVC to AVI/MOV/MP4/MPEG/WMV/FLV
P2 AVC-Intra 50/100 MXF to AVI/WMV/MPG/MP4/FLV

Adobe After Effects Renders Taking Forever? You Can Speed Them Up with Network Rendering

If you don’t have the latest and greatest system (and even if you do), there is a great way that you can actually speed up your renders in Adobe After Effects. If you’ve got another computer system or two hanging around collecting dust, you can put those machines to good use by setting up Network Rendering in AE. Check out the tutorial below from Aetuts+ to get the full scoop and get your renders flying:


It’s great that the other machines don’t need another license of After Effects to actually participate, so you can take as many systems as you want and as long as they are on your network, you can get Network Rendering up and running. Faster is faster, so even if it’s an older system, shaving off a few minutes from a render can be a big deal in the end (especially if it means you can go home early, or move on to something else sooner).

Check out this link for more information on different render setups in AE.

Who has set up Network Rendering? What would you recommend if you’ve faced any issues?

Links:

How to Set Up AE for Network Rendering on Multiple Machines — Aetuts+
Automated rendering and network rendering — After Effects Help

Rabu, 31 Juli 2013

Flawlessly Convert Sony HX200V 60p MTS files for using in FCP, iMovie, QuickTime Player


Sony Cyber-shot DSC-HX200V is a fast-shooting megazoom with excellent photo and video quality for its class, and plenty of shooting options to make casual and advanced shooters happy. Recently, I take some pictures with it of birds, try to capture flight and movement and want to select individual frames. I'm satisfied with the full HD Movie Shooting capability (1920×1080/60p) and Optical SteadyShot Active Mode.

However, My HX200V camera gave me videos as AVCHD file which I have not acknowledged with. I tried with both FCP, iMovie and quicktime, but none of them could recognize it. Is there any step-by-step work flow for this? Which software can convert video taken with my Sony HX200V Cybershot camera for working with my mac? PS: the footages are on 1080 60p. 

In this case, I googled to search the solutions. I find this 60p MTS and M2TS video format is not friendly for use on Mac, Mac platform best supported format is .mov format. So I tried to seek for the best avchd converter for mac to do convertering. Now I get this MTS/M2TS Converter for Mac from Pavtube.

I have successfully convert Sony HX200V 60p AVCHD to best codec for editing on Mac. This software is top MTS converter for Mac that can transcode AVCHD files to Apple InterMediate Codec (AIC), Apple ProRes 422 codec, QuickTime codec, etc. These output formats are specially presetted, so the conversion quality is guaranteed, I can get lossless video conversion with this tool. 

Here I will share the easy steps that you can follow to transcode Sony Cyber-shot DSC-HX200V 60p AVCHD MTS to MOV for using in FCP, iMovie and QuickTime Player. 

1. Install and run the best Sony 60p MTS Converter for Mac, it's an professional AVCHD to FCP/iMovie/QuickTime Converter which can convert Sony DSC-HX200V 60p AVCHD files to different formats on Mac (including OS X Mavericks 10.9).  
Click "Add Video" to load the 60p .mts files from Sony HX200V Camcorder to the Mac Converter. 


2. Click "format" bar to choose output format:

Choose "Final Cut Pro -> Apple ProRes 422 (*.mov)" as the best output codec for importing 60p MTS files to Final Cut Pro (X) editing.


Choose "iMovie and Final Cut Express > Apple Intermediate Codec(AIC) (*.mov)" as the best video format for editing 60p AVCHD files to iMovie


Choose "Common video -> MOV-QuickTime (*.mov)" to play Sony 60p AVCHD mts with QuickTime Player.


Step 4. You can click “settings” to customize the output parameters, adjust the resolution, bitrate as you want. 

Tips:

If you would like to add Anaglyphic 3D effect or Subtitle for your footage, click "Edit" icon to start video editing with your 3D files, such as adding Anaglyphic 3D effect(Red-Blue, Red-Green) as well as adding watermark, trim your videos and so on.

You can also click "Subtitles" option, add srt, ass, ssa suntitle you want.


Step 5. Click convert button to start converting Sony HX200V 60p AVCHD MTS to Prores/AIC/QuickTime mov for FCP, iMovie editing and QuickTime Playere playback.

After the Mac MTS to MOV conversion, you can import the converted footages to FCP, iMovie  and QuickTime Player for editing and playing smoothly on Mac.

Learn more:
How to edit Sony Cyber-shot DSC-HX200V in iMovie
Sony HX30V to FCP X, iMovie, FCE 4, Avid, Premiere

GoPro App 2.0 lets action cam owners save and share their footage

A new version of the GoPro app has been released for iOS devices bringing several important improvements. 

The GoPro App makes it easy to control your camera remotely with your iPhone, iPad or iPod touch. New features let you view, play back and share select content—so you can do more with your photos and videos than ever before.


Features:

• Full remote control of all camera functions
• Live preview for easy shot-framing
• Instantly view photos and playback videos*
• Copy photos and videos* to your device, then share via email, text, Instagram, Facebook or other app
• View the GoPro Photo and Video of the Day
• Compatible with all HERO3 cameras and HD HERO 2 cameras + Wi-Fi BacPac

What's New In This Version:

• View photos and play back videos
• Copy photos and videos* to a GoPro album on your iPhone, iPad or iPod touch
• Share the photos and videos copied to your device via email, text, Instagram, Facebook or other app
• Browse and delete files on the camera’s memory card

You can download GoPro App from the App Store for free.

Since launch, the GoPro App has primarily served as a remote control; it hasn't been much good for reviewing the day's shooting. That won't be an issue with the newly launched GoPro App 2.0. Both Android and iOS users can now browse their action camera's memory card, save and play media on a mobile device, and share any saved clips through email, MMS and social networks like Instagram. Windows Phone users aren't in line for the update right now, but their Android and iOS counterparts can grab both the new app and corresponding camera firmware upgrades at the source links.

Senin, 29 Juli 2013

Down-convert Panasonic GH2 MTS footage from 1080p to 720p for editing in FCP/Premiere

Summary: In this article, you can learn the best way to convert Panasoni GH2 AVCHD MTS to a file that FCP/Premiere can recognize on Mac(Mavericks 10.8 included) with downsizing 1080p HD video to 720p.


Panasonic Lumix DMC-GH2 

Panasonic Lumix DMC-GH2 updates the highly acclaimed if rather pricey GH1 Micro Four Thirds system camera. As such the GH2's styling is closer to that of a baby DSLR than its sibling's, the GF2 compact camera form. While stylistically similar, its size is roughly a third of the size of Olympus' Four Thirds E-5 DSLR, and closer in fact to that of a bridge camera. Except unlike a bridge camera, the Panasonic's added appeal is the ability to swap the lens in use. Therefore it's fair to say that for those who like the feel of a DSLR but not the attendant bulk, the GH2 is potentially a very attractive proposition. It's in effect a DSLR 'lite'. 

Easiest way to convert GH2 1080p .mts to 720p?

I'm a Director, DP-Editor/Gaffer. I do commercials and corporate work. I got my Panasonic GH2 and I shot all the .mts footage myself about Teaching Practices in Public Schools in Maryland. I like One-touch HD video recording and manual controls. And now I need to down-convert GH2 MTS footage from 1080p to 720p for storage and editing in FCP&Premiere. Is there any easy way (free or nominal fee)? 

Why we need to downsize the HD video?

By google search, you can see many folks are asking about how to downsize 1080p to 720p. It is my impression that if I edit with actual 720p files, it will be less strain on the system both in editing and rendering as well has hard drive space. In fact, it really does. After reducing the big video size, we will edit more smoothly, save space and make 1080p video playable on protable device like iPad.

An easy to use 1080p to 720p Converter

As in the above case, you have the need to find a professional MTS Converter for FCP/Premiere to downsize 1080p HD video to 720p. Pavtube MTS Converter for Mac is exactly the one ease of use. I have used it on my project, it is helpful in down-converting Panasonic GH2 1080p full HD video to 720p video quickly and transoding GH2 MTS file to FCP/Premiere editable Prores codec, then I can wok well with GH2 mts file in FCP and Premiere. Overall first impression is excellent. Below I will share the step-to-step guide to you.

Simple way to downconvert GH2 1080p to 720p for editing in FCP/Premiere

Step 1. Download Pavtube MTS Converter for Mac. This professional Panasonic MTS Converter can help you convert 1080p AVCHD MTS files to rich formats for use on Mac(Mavericks 10.9 included). 

Step 2. Install and launch this 1080p to 720p MTS Converter. Import 1080p MTS footage from GH2 to it. 


Step 3. Click "Format" bar to choose format for output, you can choose 
Final Cut Pro > Apple ProRes 422 HQ (*.mov) for editing in FCP and Premiere Pro.


Step 4. You can click “settings” to customize the output parameters, adjust the resolution, bitrate as you want. To down-convert 1080p to 720p, you just need set Size(pix) to 1280*720. That is the exact 720P.


Step 5. Click convert button to start converting Panasonic GH2 1080p AVCHD MTS to Prores for FCP and Premiere editing with 1280*720 definition.

As long as the conversion is done, you will get the 720p mov video files in full screen from its destination folder, and then you can import the files with 720p resolution to FCP/Premiere editing
 smoothly on Mac (including Mavericks 10.9).

Read more guides here: 

Panasonic G3 AVCHD to FCP
Panasonic DMC-FZ200 MTS to iMovie
Make Panasonic LX7 compatible with Avid MC
Panasonic Lumix GH3 MTS in FCP X
Edit Panasonic HC-V720K 1080 60p/50p MTS in FCP X
Panasonic HS900 AVCHD work with iMovie/FCE
Work with Panasonic V700 1080/50p AVCHD  in FCP

Mix Canon XF300 MXF to ProRes with multiple audio tracks for FCP X

Summary: In this tutorial, you will learn the way importing/editing Canon XF300 MXF files in FCP X smoothly by transcoding MXF to Prores on Mac(including Mavericks 10.9).


Q1: Just got a Canon XF300, it provide extraordinary image quality. I am wondering how to load my videos from XF300 to FCP X directly? Is MXF a supported format for FCP? Is it possible to keep multiple audio tracks?

Q2: Which software do I need to convert XF300 mxf files to be readable in FCP X ? I have more than 200 MXF files, I need to batch process them. Can anyone help regarding this conversion? Can I preserve the multi-track adudio?

As you can see, you will meet some stuttering problem when editing Canon XF300 MXF footage in FCP X on Mac (including Mac Mavericks). In fact, FCP does not support direct editing of Canon XF300 MXF in the timeline. If you want to edit Canon XF300 MXF in Final Cut Pro X, you first need to convert Canon MXF video to FCP compatible ProRes codec.


Required Tool: Pavtube iMix MXF

It can help us to convert Canon XF300 MXF to ProRes for FCP X editing with retaining higher quality and keeping multiple audio tracks. Below are some useful tips for you and you will know how to import Canon XF300 MXF to Final Cut Pro X on Mac (including Mac Mavericks).

Step 1. Add Canon MXF footage to the Canon MXF Converter.

Run Pavtube MXF audio Mixer. Click "Add" to load the source Canon MXF files. When the Canon MXF files are loaded to the MXF Converter, you can view the videos from the Preview window.


Step 2. Set Prores MOV as output format for Canon MXF to FCP X conversion.

Click on "Format", and select output format from the drop-down list. Follow "Multi-track Video>Multi-track Apple ProRes 422(*.mov) for editng XF300 multi-track MXF files in Final Cut Pro 6/7.


When set output folder, or click the icon folder in Output box and browse to the destination folder.

Step 3. You can click settings button to adjust the output video's parameters, such as resolution, bitrate, codec and frame rate, etc.

Step 4. Convert Canon XF300 MXF to Prores 422 for importing to Final Cut Pro X.

Click "Convert" button and the selected Canon XF305 MXF files will be converted to Prores 422 .MOV. You may check the converting progress and set auto shutdown in the convert window.

After conversion, click "Open" folder to find converted Canon XF300 footage for importing to FCP X. The importing steps reference here:

How to direct import media files to Final Cut Pro X on Mac

Additional Editing Features of the MXF Converter for Mac

- Trim, combine, de-interlace Canon MXF footage, capture Canon XF300 frame.

Trim Canon MXF clips: Click "Edit" to enter video editor, by default the "Trim" tab is activated, so just set start time and end time to include the duration you want to remain, cutting others out.

Combine/Join Canon MXF files: If you would like to join several files together, just select these files and check the Merge into one box.

De-interlace Canon MXF: Some footage may be saved as interlaced video with Juggled edges and ghosting. In that case you can set deinterlace effect to eliminate the combing. Follow "Edit"-> "Effect"-> "Deinterlacing".

Capture frame from Canon MXF: To thumbnail video frame, you may click the "Snapshoot" button when it plays to your favorable frame.


Tips:


If you don't want to get multi-track videos or your videos has less that two audio track to be converted, the latest version of Pavtube MXF Converter for Mac is designed to output each audio/video track separately.


Learn more:

Transfer Canon C300 MXF to FCP/Quicktime for editing on Mac
How to Edit Canon C300 MXF recording on iMovie?
Edit Canon XF100 MXF files in iMovie/FCE
Solve Canon XF105 MXF to iMovie importing problem
Convert Canon XF300 MXF to ProRes for FCP/Premiere Pro
Import Canon C300 MXF to Avid Media Composer
Mix Canon C500 MXF to multi-track ProRes for FCP 6/7

Kamis, 25 Juli 2013

iMovie no audio problem? Find the easy solution to fix it here

Summary: If you have the common "iMovie no sound problem" issue, just read this article, you will find the best solution here.


Q1: Want to edit in imovie and there is no audio! Can't get it to play full screen. Won't open. Wont show clip in viewer either. I have tried restarting imovie. havee restarted Macbook pro)
 

Q2: Completed my first movie in iMovie '11 and I'm having an audio problem. Searched and found many audio problems in iMovie-- too bad because it's a pretty easy program to work with!

Q3: I'm making a movie on my Mac Mini and I am struggling with this audio bug using iMovie 11.  I'm seeing this issue that I cannot solve. Any clues here? Thanks in advance. 


As above, "iMovie no sound" is a common problem asked by many mac users. What's the problem? This may lie in the unsupported codec and format of the video files that imports into iMovie. 

From Apple forum we know that many common vidoe codes and formats are not a suitable and native for iMovie, so you are suggested to transocde all kinds of videos to AIC (Apple Intermediate Codec), the favorite editing codec of iMovie in advance. This may be te easy solution!

Pavtube Video Covnerter for iMovie can fix this iMovie no sound, which supports converting videos for using in iMovie with no limition. You can do it on All major Mac OS X operating systems, like Mountain Lion, Lion, Snow Leopard and the lastest Mac OS X Mavericks. 

Steps: Convert and import videos to iMovie without losing sound issue 

Step 1: Run Pavtube HD Video Converter for Mac and video clips to it

You can click either "Add Video" button or "Add from folder" button to load source files.

If you want to combine the loaded video clips into one file, simply tick off the checkbox before "Merge into one file".


Step 2: Select "Apple InterMediate Codec (AIC) (*.mov)" as target format

In order to convert video to AIC for use in iMovie, simply hit "Format" menu and follow "iMovie and Final Cut Express" > "Apple InterMediate Codec (AIC) (*.mov)".


Settings:


Step 3: Start all kinds of videos to AIC Conversion

Click the big button "Convert" to start all kinds of videos to AIC Conversion.

As soon as the conversion is completed, you are able to click "Open" button to get the generated AIC MOV files for use in iMovie.

Step 4: Import converted videos to iMovie.

Launch iMovie, and then choose "File > Import > Movies" to import the converted videos to iMovie for further editing.  The audio of the video file will ok in iMovie and you will not have any "iMovie no sound" problem.

Now you you can edit you video projects in iMovie without any hassle. Find more iMovie Solutions here.

Rabu, 24 Juli 2013

How do I make MKV files playing on my PS3?

Summary: The guide shows you how to quickly convert MKV to PS3 playable video formats so that you can play 720p/1080p MKV videos on PS3 without problems.


MKV is a container format and well-known as Matroska video. It is wildly used for delivering HD video content which up to 1080p. It is an envelope for which there can be many audio, video and subtitles streams, allowing the user to store a complete movie or CD in a single file.

The problem is that many standalone devices simply do not support the MKV format, often preferring the MP4 container format for use with H.264/MPEG-4 AVC encoding. The PlayStation 3 (PS3) is one of them, you will find that PS3 just not a MKV Player. So is there any way to help you to play .mkv files on the PS3 without limitation?

In order to stream MKV files to PS3 for playback, you may have to convert MKV to PS3 playable format (e.g. H.264/MPEG-4). Along with some help from third-party software. With Pavtube Video Converter Ultimate, a great MKV Converter for PS3, you can easily achieve your goal smoothly.

The following guide shares with you how to encode 1080p/720p MKV to PS3 for playback step-by-step.

Step 1. Install and launch the MKV Converter for PS3, and click "Add file" or "Add from folder" button to load your MKV files. The software supports batch converison so that you can add several MKV files to convert at one time.


Step 2. Click on "Format" boarder to set output format.

Now that we're converting MKV for PS3, a recommended format is "PSP/PS3 >> PS3 Video(*.1080p) MPEG-4(*.mp4)" foramt.


Step 3. Finally click on "Convert" button to start converting MKV to 1080p HD MP4 for PS3.

In this way, you can get MKV files playable on PS3 without problems. We hope this short article will bring some new multimedia life to your PlayStation 3 (PS3) console.

See Also:

Convert Blu-ray to PS3
Rip DVD for PS3 playback

Selasa, 23 Juli 2013

Magic Lantern firmware boosts dynamic range of Canon 5D III and 7D


The folks at Magic Lantern are no stranger to adding new features to Canon DSLRs, courtesy of their EOS Camera Tool software.  

Magic Lantern's brought some miraculous features to Canon EOS DSLRs lately, including RAW video recording on the 5D Mark III, and video recording, period, to the 50D. Its latest feat is no less amazing, even for jaded DSLR shooters.

By exploiting unused dual ISO amplifiers on a sensor chip in the Canon 5D Mark III and 7D, new firmware allows you to record lighter parts of a scene at ISO 100 and darker portions at ISO 1600. It works with RAW video and stills on the 5D III and RAW stills only on the 7D, with both requiring post-processing after capture. That bit of creative coding increases the dynamic range of both cameras to around 14, though not without some drawbacks. Namely, the 7D implementation is buggy for now, you'll lose some resolution while gaining aliasing in shadows and highlights, and won't be able to check critical focus by zooming in. Still, the organization has a track record of quickly improving new features -- so, if you've got the guts to risk voiding your warranty, hit the source.

Their latest creation - called Dual ISO - dramatically increases the dynamic range of the 5D Mark III and EOS 7D by four stops, bringing the total dynamic range to 14EV. This allows you to pull detail out of the shadows with a lot less noise than with the 'stock' firmware. The technical details are complex, but simply put, it works by interlacing two rows of pixels captured at ISO 100 with two rows taken at a higher sensitivity (usually ISO 1600). The low sensitivity rows capture highlight detail, while the high ISO rows capture shadow detail. When they are combined, you get relatively noise-free shadows without blowing highlights.

According to Magic Lantern, there are some downsides to using the Dual ISO firmware, though. Vertical resolution is reduced by half and there's more moiré and aliasing in over and underexposed areas. The author also warns that since this software modifies the sensor's operation, you could end up frying your camera. 

Canon Related guides:
 
Transcode Canon PowerShot N to FCP X
Canon EOS 6D MOV to FCP
Import Canon 100D MOV to FCP 6/7
Edit T2i/550D MOV in FCP X
Play Canon T5i mov on QuickTime
Edit Canon EOS T4i MOV in iMovie
Work with PowerShot N in Apple Aperture 3

Senin, 22 Juli 2013

How to Convert QuickTime movie to iMovie on Mac OS X 10.9 Mavericks

Summary: If you don't know how to smoothly import QuickTime movie to iMovie on Mac OS X 10.9 Mavericks, just read this article, you will get the tools and steps, follow it!


QuickTime (.MOV) file format is a file extension used by the QuickTime-wrapped files. The format was created by Apple Computer to work with multimedia files. MOV is a container format and can contain video, animation, graphics, 3D and virtual reality (VR) content or text (for subtitles, for example).

However, many Mac users are still puzzled by one thing that some files from QuickTime with MOV file extension can't be imported into iMovie on Mac OS X 10.9 Mavericks as iMovie does not support the standard MOV QuickTime file format.

If you want to import a QuickTime movie file into iMovie on your Mac OS X 10.9 Mavericks, you are suggested to transocde QuickTime videos to AIC (Apple Intermediate Codec), the favorite editing codec of iMovie at first. The Apple Intermediate Codec (AIC) does not use temporal compression, so every frame can be decoded and displayed immediately without first decoding other frames. The drawback of this codec is that it requires much more bandwidth and hard drive storage space. The following are steps for you to QuickTime MOV to AIC MOV for iMovie editing.

Step 1: Run Pavtube Mavericks HD Video Covnerter for iMovie and video clips to it. You can click either "Add Video" button or "Add from folder" button to load source files.


If you want to combine the loaded MOV clips into one file, simply tick off the checkbox before "Merge into one file".

Step 2: Select "Apple InterMediate Codec (AIC) (*.mov)" as target format.

In order to convert video to AIC for use in iMovie, simply hit "Format" menu and follow "iMovie and Final Cut Express" > "Apple InterMediate Codec (AIC) (*.mov)".


Settings:


Step 3: Start QuickTime MOV to AIC Conversion.

Click the big button "Convert" to start converting QuickTime movie to iMovie on Mac OS X 10.9 Mavericks. As soon as the conversion is completed, you are able to click "Open" button to get the generated AIC MOV files for use in iMovie.

Step 4: Import converted videos to iMovie 8/9/11.


Launch iMovie, from the File menu, choose Import > Movies, navigate to the folder that output MOV videos are saved. Select the files and click "Import".

Now, start to create your masterpiece with QuickTime movie in iMovie (iMovie 11/iMovie 09/iMovie 08/iMovie HD)!

Read more iMovie solutions:

Convert AVCHD MTS/M2TS to AIC MOV for iMovie?
Load Canon Vixia AVCHD MTS to iMovie
Encode Sony AVCHD MTS/M2TS to AIC MOV for iMovie
Edit Panasonic MTS files with iMovie
How to edit Nikon D5200 MOV with iMovie freely
Import Canon MXF files to iMovie

Transcode Sony NX5U MTS to ProRes for Aperture 3/Premiere Pro on OS X Mavericks 10.9

Summary: In this article, you can get the info of covnerting Sony NX5U AVCHD to Aperture 3/Premiere Pro compatible Prores codec for importing and editing on OS X Mavericks 10.9.


The first in Sony's line of NXCAM solid-state camcorders, the NXCAM HXR-NX5U is also the company's first professional-level AVCHD camcorder. And while it may look similar to its HDV predecessor, the HVR-Z5U, in fact this is a very different animal. And because the NX5U can capture to media cards plus an optional flash memory unit, you can simultaneously record a different signal to each, whether HD + a backup or HD + SD. The footage is then easily downloaded to a computer or backup drive using USB 2.0.

Sony HXR-NX5U can capture HD and SD video in AVCHD and MPEG-2 formats--and save it to solid state media--is only one of its distinctive traits. Full-raster 1920 x 1080 video is another, including the option of recording 720/60p video as well as 60i, 30p and 24p. With the 1080 video recording AVCHD file from NX5U, you may face problem when trying to import/load the 1080 AVCHD MTS to Aperture 3/Premiere Pro on OS X Mavericks 10.9.

Well, as is known to us, Aperture 3 and Premiere Pro accepts Prores MOV best, so, to convert AVCHD to Prores MOV is a good choice for editing Sony NXCAM HXR-NX5U AVCHD MTS inAperture 3/Premiere Pro.

To do the job, AVCHD Converter for Mac is an ideal tool. With it, you can convert Sony NX5U 1080 AVCHD files to Apple ProRes 422 for editing with Apple Aperture 3 and Premiere Pro on OS X Mavericks 10.9 without losing quality or rendering.

Below is the step-by-step guide for you to quickly convert Sony NX5U 1080 AVCHD to Aperture 3 or Premiere Pro compatibel Prores codec on Mac Mountain Lion, Lion, Snow Leopard or Leopard, OS X Mavericks 10.9.

Step 1: Download Pavtube Mavericks AVCHD MTS/M2TS Converter and import your Sony NX5U AVCHD file. This software will solve your AVCHD to Apple Aperture 3/Premiere Pro importing problems.


Step 2: You will need to choose the output format for Aperture/Premiere. You are recommended to choose Final Cut Pro -> Apple ProRes 422 (*.mov), it's great for editing in Apple Aperture and Premiere Pro. There are more formats for output, you can pick as you need.


Step 3: Click "Settings" button to adjust the output video's parameters, such as bitrate, resolution, etc. for example, you can choose the resolution as 1920*1080 or 1280*720, that's 1080p or 720p resolution, great for editing.


Step 4: Start converting Sony NXCAM NX5U 1080 AVCHD to Prores for Apple Aperture 3/Premiere Pro.

After converting, you can load Sony NXCAM NX5U 1080 AVCHD MTS to Apple Aperture 3/Premiere Pro for editing as you want, now you can have a try.

Find more solutions on Pavtube MTS column and Sony Column:

Sony VG900/VG30 MTS and Avid MC
Sony FS700 1080 50p/60p AVCHD workflow for Avid Media Composer
Sony NEX-VG900 AVCHD work with Final Cut Pro
Sony NEX-5N/NEX-7/A57/A65/A77 1080 60p AVCHD to FCP
Transcode Sony PJ580V to FCP X
Import Sony PJ650V MTS to ProRes for FCP 6/7/X on Mac
Edit Sony HX200V AVCHD in Final Cut Pro on Mac
Effortless Ingest Sony XR500 AVCHD to FCP 7

Kamis, 18 Juli 2013

Import Blackmagic Design HyperDeck Shuttle 2 DNxHD files to FCP

Summary: In this tutorial you will know how to transcode Blackmagic Design HyperDeck Shuttle 2 recorded DNxHD files to ProRes 422 for importing to Final Cut Pro on Mac.


Blackmagic has announced that the Hyperdeck Shuttle 2 will now have the option of recording in DNxHD, writing files in industry standard MXF format. DNxHD is a codec with similar performance to Apple ProRes, but is developed and championed by Avid (Although you can work with these files in Premiere Pro). This will dramatically improve recording times (5x or more) and have the added benefit of making total project sizes far more manageable…all without reducing visual quality in a perceptible way.


For people who want to edit their DNxHD MXF videos from Blackmagic Design HyperDeck Shuttle 2 on mac, FCP should be one of the top choices. Although HyperDeck Shuttle 2 announced to be perfect with Media Composer, Final Cut Pro, Premiere and leading video applications like DaVinci Resolve. But the compressed DNxHD MXF video is not very native and well compatible with FCP as some users still meet problems when trying to import these videos in FCP.

Therefore the best workflow it to convert Blackmagic camera MXF videos to ProRes for FCP on Mac. To accomplish this goal, a powerful, easy-to-use DNxHD to ProRes Converter can help you out within a few clip. It can deal with MXF (DNxHD) videos from HyperDeck Shuttle 2  to FCP without quality loss.

Easy steps:

1. Install this professional MXF Converter for Mac, drag and drop your  Blackmagic Design HyperDeck Shuttle 2 recorded DNxHD files into it. The program support batch load and convert video file.


2. Choose format that you need. To convert DNxHD to Apple ProRes, you can click and choose “Final Cut Pro -> Apple ProRes 422 (*.mov)”.


3. You can adjust the ProRes parameters according to your need. (Optional)


4. Edit video file. (Optional)

You can click Editor button to customize the video before converting videos. Six tabs are available: Trim, Crop, Text Watermark, Watermark, Effect and Audio Replace, etc.

5. Start Conversion.

Click the “Convert” button to start transcode Blackmagic Design HyperDeck Shuttle 2 recorder DNxHD files to ProRes for Final Cut Pro.

As soon as the format conversion is completed, you can import the converted video to FCP for editing on Mac OS X, etc.


More step-by-step guides: 

Make Blackmagic Production Camera 4K footage editable in FCP 6/7/X
Encode hyper deck shuttle 2 mxf to mov for fcp, fce, imovie, avid, premiere pro
Convert Black Magic Intensity Pro ProRes files to DNxHD MOV for Avid Media Composer 6

Rabu, 17 Juli 2013

Transfer Canon HF R40/R42/R400 60p AVCHD to Avid, Premiere, Sony Vegas, Pinnacle,Movie Maker and Cyberlink

Summary: Tricks for transcoding Canon Vixia HF R40/R42/R400 60p AVCHD to Windows PC prefered codec for editing in Avid, Premiere, Sony Vegas, Pinnacle, Windows Movie Maker and Cyberlink. 

Canon updates its VIXIA line of digital camcorder, introducing three new HF R-series Full HD models designed to capture and share every day moments easily. The new HF R42, HF R40 and HF R400, built for everyday shooting, delivers improved image quality, sharing capabilities and user experience. Three models share many their features but differ from each other in storage capacity and connectivity options.


Each of these new VIXIA camcorders sport a 3.28 Megapixel Full HD CMOS image sensor, a new DIGIC DV IV image processor and a 53x Advance Zoom Canon HD Video Lens to capture HD movies. They can record Full HD MP4 videos at 35Mbps and Full HD 28Mbps AVCHD Progressive 60p videos. If you shot the 1080/60p movies in AVCHD format with Canon HF R40/R42/R400, some problems would occur during the importing into Windows editing software like Avid, Premiere, Sony Vegas, Pinnacle, Windows Movie Maker and Cyberlink.

In fact, AVCHD format is not supported by many editing softwares. It is not an ideal video format for editing softwares to support owing to its special codec. So if you want to edit Canon HF R40/R42/R400 1080 60p files in Avid, Premiere, Sony Vegas, Pinnacle, Windows Movie Maker and Cyberlink smoothly, you need to convert Canon Vixia 60p AVCHD to Window PC compatible codec first.

To get the work done,  Canon Vixia MTS Converter is the best third party program to achieve your goal smoothly. The software is a great choice for converting AVCHD videos to Avid, Premiere, Sony Vegas, Pinnacle, Windows Movie Maker and Cyberlink editable formats. It works with Sony, Panasonic and Canon AVCHD .mts and .m2ts footage. There are various export format for users to choose from, including AVI, MPEG-2,MOV,WMV. It also lets users to convert AVCHD files into common video formats like MP4, MKV, M4V, etc.


(Tips: If you are mac users, you can try this Canon MTS Converter for Mac)

Download  Pavtube AVCHD MTS/M2TS Converter here:


Guide: How to Convert Sony A99 MTS clips to DNxHD/AVI/WMV/MPEG-2 for Avid, Premiere, Sony Vegas, Pinnacle, Windows Movie Maker and Cyberlink 

Step 1. Connect Canon HF R40/R42/R400 camcorder to computer via USB cable, and it is easy to download videos from Canon HF R40/R42/R400 to your computer hard drive. 

Step 2. Install and run Pavtube MTS/M2TS Converter as the fast MTS to Windows PC Converter, click the "Add Video" button or the "Add from folder" icon to load your .MTS videos directly from your camera or a camera archive on your computer's HDD. 
 

Step 2. Set output video format for your video conversion.

Click the "Format" bar and choose "Adobe Premiere/Sony Vegas -> MPEG-2 HD Video (*.mpg)",or select WMV/MOV, you can also choose "HD Video -> AVI HD Video (*.avi)". Finally, click the file icon beside output bar, and choose a destination folder for saving output files. 


Tips: You can click “Settings” button in the main interface of the software to customize the output parameters, such as resolution, bitrate, etc. 

Step 3. Click “Convert” button to start converting Canon HF R40/R42/R400 1080/60p AVCHD MTS to Avid, Premiere, Sony Vegas, Pinnacle, Windows Movie Maker and Cyberlink  optimized videos. Then you could click “Open” button to find the converted video in destination folder.

In this way 
Canon HF R40/R42/R400 60p MTS/M2TS footages can be successfully loaded to  Avid, Premiere, Sony Vegas, Pinnacle, Windows Movie Maker and Cyberlink for editing and authoring. 

See also: 

Canon HF M500 AVCHD workflow on FCP, FCE, iMovie
How to import Canon Vixia MTS to Windows Movie Maker?
Work with Canon Legria HF20/HF200 MTS Videos on Mac
Transcode Canon C100 AVCHD on Mac

Selasa, 16 Juli 2013

MXF to AIC MOV Converter-Edit Canon C300 MXF in iMovie 11 and FCE 4

Summary: By transcoding MXF to AIC MOV format, you can smoothly import/edit Canon C300 MXF files into iMovie 11 and Final Cut Express 4 without problmes. 


Bringing Canon’s expertise and decades of experience designing sensors, lenses, image processing and design to the world of motion picture capture, the EOS C300 camera has been designed to meet the demanding needs of cinema industry professionals, providing a modular, portable and eminently adaptable system of cameras, lenses and accessories built for moviemaking in the 21st century.


A variety of physical and electronic C300 elements are borrowed liberally from Canon’s XF series camcorders, chief among them being the recording codec, known as Canon XF. It is a 50Mbps 4:2:2 MPEG2 codec utilizing the widely supported .MXF wrapper, writing 1080p30 and 720p60 video to Compact Flash at a choice of either 50Mbps or 35Mbps.

You may have used Canon C300 camcorders to record many high-definition footages which are in MXF video format, this video format is good for record videos, but it’s not compatible with many editing software, such as iMovie 11 and FCE 4 on Mac.

You may have the need to import C300 MXF footage to iMovie 11 and FCE 4 for editing. So what to do? The best way is to convert MXF to iMovie/FCE supported video format, like Apple InterMediate Codec (AIC) .MOV format. Now you can follow the step-by-step guide to convert C300 recorded mxf files to AIC MOV for iMovie 11/FCE easily.

1. Free Download Pavtube MXF Converter for Mac. The program is an excellent easy-to-use and intuitive Mac tool for camcorder users. It is good at batch converting MXF recordings shot by Panasonic P2 camcorders, Sony XDCAM camcorders, Canon XF series cameras to ProRes/AIC MOV formats compatible with your Mac Video editing software like iMovie, Final Cut Pro (X), Final Cut Express. 


2. Install and launch this Mac MXF to AIC  Converter, import Canon C300 MXF footages to the software.


Step 2. Click the "Format" option, select "iMovie and Final Cut Express > Apple InterMediate Codec(AIC)(*mov)" for editing Canon C300 MXF in iMovie/FCE.


Some more helpful features of the batch MXF to MOV Converter for Mac:

1. Adjust video and audio parameters. (Optional)

Click "Settings" button to customize the output video and audio settings by yourself. But if you are not good at it, you'd better use the default parameters, they will ensure you a good balance between file size and image quality basically. You can change the resolution, bitrate, frame rate as you need.

2. Editor (next to "Add" icon)- click to set deinterlace, denoise, mute, volume up, trim, crop, etc.


Step 3. When above steps finished, you can click "Convert" button to start converting Canon C300 MXF to AIC MOV for iMovie 11/FCE 4 with a super fast speed. With the excellent C300 MXF to MOV Converter, you can deal Canon C300 MXF footage on Mac with best video and audio quality as you want.

Related article:

How to convert Canon MXF to FCP 6/7?
Transfer Canon C300 MXF to FCP/Quicktime for editing
Two ways to import Canon XF305 MXF to FCP
Convert Canon XF300 MXF to iMovie/FCE
Does XF105 MXF Compatible with FCP
Canon XF300/XF305 MXF to iMovie
Import Canon C500 MXF to Aperture 3
Work with C500 MXF in FCP 6
Transcode XF100 MXF to FCP 6/7