


Summary: In this tutorial, you will learn the way importing/editing Canon XF300 MXF files in FCP X smoothly by transcoding MXF to Prores on Mac(including Mavericks 10.9).
Q1: Just got a Canon XF300, it provide extraordinary image quality. I am wondering how to load my videos from XF300 to FCP X directly? Is MXF a supported format for FCP? Is it possible to keep multiple audio tracks?
Q2: Which software do I need to convert XF300 mxf files to be readable in FCP X ? I have more than 200 MXF files, I need to batch process them. Can anyone help regarding this conversion? Can I preserve the multi-track adudio?
As you can see, you will meet some stuttering problem when editing Canon XF300 MXF footage in FCP X on Mac (including Mac Mavericks). In fact, FCP does not support direct editing of Canon XF300 MXF in the timeline. If you want to edit Canon XF300 MXF in Final Cut Pro X, you first need to convert Canon MXF video to FCP compatible ProRes codec.
Required Tool: Pavtube iMix MXF
It can help us to convert Canon XF300 MXF to ProRes for FCP X editing with retaining higher quality and keeping multiple audio tracks. Below are some useful tips for you and you will know how to import Canon XF300 MXF to Final Cut Pro X on Mac (including Mac Mavericks).
Step 1. Add Canon MXF footage to the Canon MXF Converter.
Run Pavtube MXF audio Mixer. Click "Add" to load the source Canon MXF files. When the Canon MXF files are loaded to the MXF Converter, you can view the videos from the Preview window.
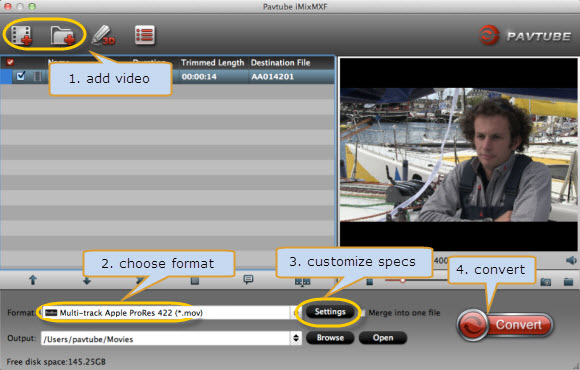
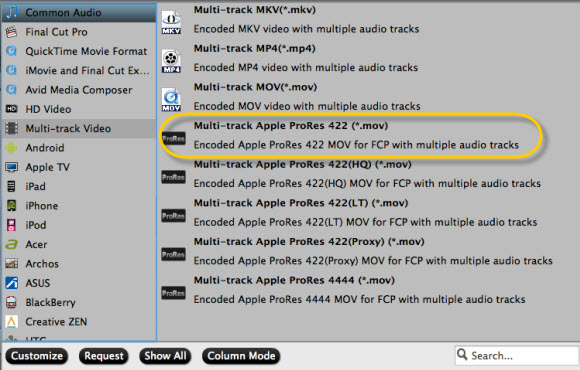
Step 2. Set Prores MOV as output format for Canon MXF to FCP X conversion.
Click on "Format", and select output format from the drop-down list. Follow "Multi-track Video>Multi-track Apple ProRes 422(*.mov) for editng XF300 multi-track MXF files in Final Cut Pro 6/7.
When set output folder, or click the icon folder in Output box and browse to the destination folder.
Step 3. You can click settings button to adjust the output video's parameters, such as resolution, bitrate, codec and frame rate, etc.
Step 4. Convert Canon XF300 MXF to Prores 422 for importing to Final Cut Pro X.
Click "Convert" button and the selected Canon XF305 MXF files will be converted to Prores 422 .MOV. You may check the converting progress and set auto shutdown in the convert window.
After conversion, click "Open" folder to find converted Canon XF300 footage for importing to FCP X. The importing steps reference here:
How to direct import media files to Final Cut Pro X on Mac
Additional Editing Features of the MXF Converter for Mac
- Trim, combine, de-interlace Canon MXF footage, capture Canon XF300 frame.
Trim Canon MXF clips: Click "Edit" to enter video editor, by default the "Trim" tab is activated, so just set start time and end time to include the duration you want to remain, cutting others out.
Combine/Join Canon MXF files: If you would like to join several files together, just select these files and check the Merge into one box.
De-interlace Canon MXF: Some footage may be saved as interlaced video with Juggled edges and ghosting. In that case you can set deinterlace effect to eliminate the combing. Follow "Edit"-> "Effect"-> "Deinterlacing".
Capture frame from Canon MXF: To thumbnail video frame, you may click the "Snapshoot" button when it plays to your favorable frame.


Tips:
If you don't want to get multi-track videos or your videos has less that two audio track to be converted, the latest version of Pavtube MXF Converter for Mac is designed to output each audio/video track separately.
Learn more:
Transfer Canon C300 MXF to FCP/Quicktime for editing on Mac
How to Edit Canon C300 MXF recording on iMovie?
Edit Canon XF100 MXF files in iMovie/FCE
Solve Canon XF105 MXF to iMovie importing problem
Convert Canon XF300 MXF to ProRes for FCP/Premiere Pro
Import Canon C300 MXF to Avid Media Composer
Mix Canon C500 MXF to multi-track ProRes for FCP 6/7
0 komentar:
Posting Komentar